

Kasserine 43-
Axis Strategy & Tactics
by
General
Staff
| |
Kasserine 43-Axis Strategy & Tactics
|
|
Turn 1 in Kasserine 43 (by Doug Bevard) is crucial as Axis, possibly more so than the first turn in a lot of other scenarios. For the Axis it is vital to try and eliminate as many units as possible in the immediate vicinity of your start positions. There is a tendency to try for ground first. But having played this as Axis I can assure you that if you don't destroy these units on turn 1 they will come back to haunt you- particularly in the sense that they constantly attrite your main push towards Kasserine by forcing you to divert units to deal with them to keep your lines of communications open. Given the lack of units you start with, every unit diverted from the main objective is one unit too many.
Another advantage of eliminating these enemy units on turns 1 and 2 is that it drastically (I think) reduces and hopefully eliminates enemy reconnaissance in the main battle area and this is important when you get to the ridge line east of Kasserine- the enemy will be wondering which flank you might attempt to turn- will it be north or south? If he doesn't know or isn't sure it may force him to de-concentrate his assets. This is all without mentioning the obvious VPs (Victory Points) gained for enemy losses.
The following is just one suggested start. But first, decide on your own tactics and strategy, then compare against the following. I'd be interested to hear thoughts on pluses/minuses among the two (yours vs. the following). Also try this against the PO (Programmed Opponent). And you might want to play a hot seat game to see what your options would be as Allies.
At the start of turn 1 first place all ground units on minimize losses (so rounds don't get burned up too quickly) and all air units on limit losses.
(a) Move 2 units forward so that following units aren't caught in a 'traffic jam' that will increase movement costs:
1. 501 Heavy Panzer: 40,18->38,19.(b) Move artillery units in position to provide covering fire for units attempting to move through enemy ZoCs (Zones of Control):
1. 90 Artillery: 41,18->39,19 and leave on Tactical Reserve to aid in disengagement-
it's going to be used against one or other of the enemy positions later and
can possibly move forward.
2. 155 Artillery: 38,24->37,22. Leave on Tactical Reserve to start and then
use against non-adjacent hexes in direct support mode later, targeting the hex
when it won't unnecessarily soak up part of your combat rounds- in other words
not prior to you having around 12/17 (70.6%) of your turn remaining. You obviously
don't want to direct assault with this unit but you do want it to be able to
move later if it has any MP's (Movement Points) remaining after the destruction of the enemy-
if it occurs this round. So DON'T dig in- leave on Tactical Reserve. Remember-
Artillery will only support your attacks if it's NOT in mobile deployment mode[i].
(c) Move remaining units into position.
1. 2/7 Panzer: 40,17->38,18.(d) Leave the remaining units of 21st Panzer Division Static for the moment. This provides for some degree of flexibility in movement depending on combat outcomes of RBC (Retreat Before Combat) attempts to follow.
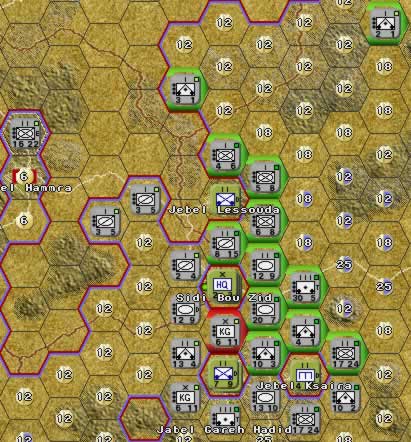
Place all of your Air on Combat Support. Now try for an RBC against the US Engineers in 39,21, by moving 2/86 Panzer Grenadier from 40,18->40,20 [ii]. Then choose Orders: Ignore Losses for the unit and right click on the enemy engineers. If you get an RBC the unit will retreat, either to 38,21 and/or 39,22, depending on whether the unit breaks down or not. Try for an RBC on 39,22 using 2/104 first with 1/5 Panzer moved up to 38,22- the goal is to 'herd' the remnants into 37,21 and then close the door- make sure you don't shut the door without everyone inside by attacking 38,21 before 39,22 if you have 2 or more enemy units. If a broken down piece of the engineers (or even the whole unit) retreat after the RBC to 38,21, try running it down with 1/5 Panzer- again, set to Orders: Ignore Losses. Don't use 1/5 Panzer on 39,22- you need the MPs for the attack on 37,21. Don't use 2/86 Panzer Grenadiers again either- if you get all the units 'herded' into 37,21 this unit can start back up and make progress towards Kasserine by helping with the combat at Sidi Bou Zid with the rest of its division.
If everything goes well and the 'herding' is successful you're left with some surplus units. The Lang AT 'piece' can head for Jebel Aboid maybe helping destroy 2/168 Infantry at 37,17. 2/104 Panzer Grenadier can either help with the combat at 37,21 (my preferred option) or start for Bir el Hafey. 609 AT should start for Bir El Hafey.
If this doesn't work (and it usually doesn't), then move your remaining ground units of 21st Panzer Division into positions as follows:
1. 1/5 Panzer: 38,24->38,21
2. 609 AT: 38,24->40,21.
3. 2/104 Panzer Grenadier: 39,25->39,22. Again DON'T take the AI suggested
route. Go forward hex by hex and then onto the hill- it saves you 1 MP. This
may be useful here to provide a flank attack opportunity with a powerful unit
if your first attack doesn't succeed.
This completely surrounds all enemy units in the vicinity of Sidi Bou Zid with
the exception of 2/168 Infantry- final dispositions (assuming no 'lucky strike')
would be as illustrated below.
1. Why not go through Bir el Hafey? Well- it's not a VP location, and if he trots off along this track you should consider yourself lucky. Something of a blind alley and as long as you keep Jebel Hammra occupied and tracking any units down here you should be OK. Besides on turn 2 I'd suggest moving two units (DAK AT & KG- 21 Panzer Division- that is if you didn't succeed with your RBC at Jebel Ksaira and start moving one or both of 2/104 Panzer Grenadier and 609 AT already) along here to make it useful as an alternative supply route, open it up for your intelligence and to be well warned if there's any later movement down here to try and cut your supplies or for any dash for end game VPs.
2. Why not try and get other units further towards Kasserine? If you don't destroy these units NOW this will probably be the only chance you'll get. Once the enemy gets his hands on them he's going to avoid at all costs positioning them so this can happen. You won't EVER get this situation handed to you on a plate again during the scenario. And you'll end up with a hit and run pursuit (sure it's great fun!) across the plain where you aren't getting maximum mileage.
3. Why not split a unit or two and make further progress? I checked breakdowns and broke down a couple of units of 21 Panzer Division (the obvious choice to make serious headway towards Kasserine): 580 Reconnaissance and 1/104 Panzer Grenadier. The main problem is that the loss of proficiency means they have a lower movement allowance and therefore don't make it as far as single entities and not as far as my suggested move for 1/104 Panzer Grenadier. I'd prefer to stick with my original idea here and still maintain that the Allies going towards Bir El Hafey southeast is folly for them and splits their force. Look at in hot seat mode from their perspective- would you do it given what you have available?
This doesn't happen very often for the Axis at this stage of the war and the choice/chance here could be yours!
Before you attack anything on the ground, but after you've moved everything, start finishing the air war once and for all. Set all air on limit losses- see section 10 for rationale. Place:
1. JG I/53 & II/53 on Air Superiority.
2. Everyone else conducts airfield attacks against the Allied Air Force stack,
except StG 87- leave on Rest. I'd suggest you don't get tempted to do anything
else with StG87- it might get to its destination first to be met by (and slaughtered
by) Hurricanes before your other planes have hit their airfield. The reason
for holding this unit back is that I just find keeping one fresh unit in reserve
for round 2 of turn 1's combat tends to finish the job- after round 1 most Allied
Air Cover is back on the ground reorganizing and demoralized. More later.
Once this is done, click to end this round.
You should find a large # of enemy planes are destroyed (50%) with 80% of your turn remaining. You may take heavy losses (sometimes the same # of planes) but you can better afford it, and your replacement rate is better in this scenario and you are shortly going to finish off the job. Sometimes you may find your results are better- possibly up to a 2-1 ratio in destroyed planes.
Now set up ground attacks (all at minimize losses to avoid burning up too many rounds of combat). This means those that would leave you with roughly 70% of your turn remaining. These would be:
1. 2/7 Panzer AND 501 Heavy Panzer (Yes- trembling with anticipation and delight- your Tigers (your nice new toys)- you might as well intimidate)->Sidi Bou Zid Stack (37,19), with 12/15 MPs remaining (80%) each. Put 2/7 Panzer on Limited Attack- you don't want it to advance and do want it to be in a better position to move towards Jebel Aboid later (See section 9.1).Lastly set up the same identical air attacks again as on round 1- this time add in StG 87 with an airfield attack also. JG 1/53 and II/53 should remain on Air Superiority missions.
This should wipe the remainder of the Allied Air Force out. If not repeat dosage. The ground attack results may vary but if lucky both stacks should be destroyed with maybe 30% of your turn remaining.
For those new to TOAW (myself included) this is all great practice in really trying to maximize the # of combat rounds you get. Try and keep units on roads while attacking by using limited attack option- that way if you destroy enemy units yours are better placed (and supplied) for movement next round/turn.
Hopefully 501 Heavy Panzer should have advanced into Sidi Bou Zid. If you can (and are lucky with combat) move it and 3rd/580 Reconnaissance (or whichever piece went in 36,18) to 36,17 and use it to help the attack on Jebel Lessouda. Both of these will then be on the road so will be well supplied and can prevent 2/168 Infantry from retreating there when attacked.
You can try (if you really want to maximize rounds) attacking remaining Allied positions WITHOUT using those units that only have MPs available for use in later rounds- in other words DON'T use units in attacks against remaining positions that have say 2/17 MPS left (11.7%) when you have 30% of your turn remaining- this will just take you down to at least only 10% of your turn remaining after combat and will possibly (probably) end your turn. In practice this means using 1/5 Panzer and 1/90 AT alone against 3/168 Infantry and 175 Artillery north of Jebel Gareh Hadid and only 2/69 Panzer Grenadier and 10 Reconnaissance against Jebel Lessouda.
If you do try this you may be able to get an air strike in (assuming you've finished up the Allied Air Force- if not go back and try again) on US armour units near Sebitla (27,13) to soften them up for turn 2- if so use fighters or Stukas with their better anti-armour values. Or if you can see an enemy stack near Tebessa then hit that with everything you've got- this would be my preferred target as you can use all planes available- not just those with good anti-armour values- since much of it is infantry. Just don't touch the US units at Jebel Aboid- you may activate them prior to their usual turn 3 start.
But MAKE SURE all remaining active air is on Interdiction at the close of your turn- the supply degradation effects are well worth it and if enemy air is totally destroyed you won't need Air Superiority for the rest of the scenario. Don't use Air too harshly- its best use seems to me to be interdiction. The bombers seem useless against armour. I only use them against non-armour units (see for yourselves- check the respective anti-armour unit ratings). The fighters are better and I only use them against armour stacks except in desperation- again best bang for the buck is interdiction.
2/7 Panzer should be able to help in eliminating 2/168 Infantry en route to Jebel Aboid next turn. 90 Artillery can move to Sidi Bou Zid or remain in position to support the attack on 2/168 if you are trying for more rounds. 609 AT should get back on the road for supply benefits if possible.
But post-round 2 and given terrain you're not going to get much further and, all things considered, I'd recommend attacking these two positions with everything remaining available on the ground using Limit Losses- hit them hard and they may well be reorganizing on their turn. Also some terrain may require more than 2 MPs remaining for an attack and trying to finesse rounds here may mean you won't have them (or their flank attack advantage) when you need them. This pretty much ensures the round ends. This has the added advantage of you being able to place with total certainty ALL (assuming the Allied Air Force is destroyed) air on interdiction for the check at the beginning of next turn to start throttling enemy supply lines/values. If you haven't destroyed the enemy air yet just leave one air unit on Air Superiority for security and go back and finish the job next turn.
From here on in I can't specify much else given that combat results vary. Make sure you maintain the encirclement at all times- use Limited Attack if you need some firepower without the unit having to move. And don't worry about enemy turn 1 here- there is NO (repeat NO) chance of rescue. What I can say with some exactitude is that you should be able to mop up any remnants in round 1 combat on turn 2 and turn towards Kasserine singing a hearty 'Deutschland uber Alles'- you have a significant 'quick win' under your belt that should give the enemy pause for thought plus you now have total mastery of the skies.
Turns 2+ are obviously variable and subject to enemy reactions/intentions and general conditions so I can only offer some general comments on later Strategy & Tactics:
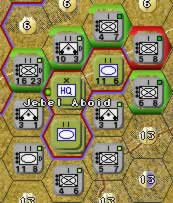
Northeast. I'd argue it's vital to divert some PzKfwIVs[iv] towards this front to help the 2 Panzer Grenadier and 1 AT unit matched up here and entering turn 2. It's too even a contest and you can find that the 3 units by themselves are just kept busy by this group for most of the scenario- in addition it's possible for the enemy to break down his units and mill around in your rear towards the end of the scenario, possibly taking and holding VP Locations. One possible deployment prior to any Turn 2 combat (other units have already headed west) is illustrated below:
I think it's definitely worth going for the quick kill as above with 2/7 Panzer, Lang AT and a Reconnaissance unit (for the high MPs and Reconnaissance Value to get behind the enemy) from the south. This also ensures enough units for encirclement. The alternative to destroying these units seems to be a perpetual running combat with them as they attempt to withdraw.
Usually, this is the first enemy line of defence after their (hopefully for you) disaster around Sidi Bou Zid. Before you totally commit your units to combat here it is vital to seize hex 30,9 east of Jebel Mrhila- it will give you a bird's eye (and breathtaking) view of all enemy dispositions north on the plain to Rohia and west to Kasserine. Once you take it you will notice a lot of hexes changing from 'unknown' status to observed, the difference between these being outlined in the help file:
"Your knowledge of any particular map location may be:
This will allow you to make your dispositions accordingly, especially in whether you decide to go north or south of this village to try and outflank his position.
Northwest. I think it's arguably worth sending a reconnaissance unit (33 Reconnaissance) on turn 2 up from the southwest towards Tebessa as a threat- you get 100 permanent VPs (and reduce enemy supply) if you take it and the unit can possibly slip past demoralized units. If you get it over to 5,19 (after 2 turns movement- dig it in with the 1 MP remaining) it acts as a dual threat- to possibly outflank any line forming near Feriana and as a threat to Tebessa. The enemy can react to both potential threats, both moving units down through El Ma el Aboid and extending their line west. This is great for you as it moves units westwards (maybe) on the Feriana front and at least two units (if he also takes the Tebessa threat seriously) are drawn towards your one- a ratio in your favour given the paucity of units available. Even if you don't get Tebessa it forces him to use resource to keep an eye on this (fast) unit, and any movement of his is subject to interdiction. And if you get close enough you may be able to 'spot' enemy stacks for air attack. All in all, a 'no lose' situation it seems to me.
If you do take Tebessa you MUST keep it THROUGH the enemy turn (i.e. through the Bookkeeping Inter-Turn Phase) to gain the 100 permanent VPs. Once done you can then decide if it is needed elsewhere, possibly near Bou Chebka and/or Kassserine- if so evacuate. Or go for Thala. Having a unit in his rear causing chaos and confusion (and maybe reducing his supply) forces him to expend resource on either hunting you down or at least tracking you- a reconnaissance unit is ideal for you here.
West Centre. Don't split your force too much and go for both. Choose one avenue to approach Kasserine and go for it, but make sure a unit or so goes for the other- he'll be forced to send something to counter. Sometimes the enemy almost makes this decision for you- the pass is sometimes not well garrisoned and can be taken quickly using, say, Italian units with support from artillery in the valley south- place this wisely (12,16?) and it can support both this quick thrust and a main effort east of Thelepte. If you get it garrison it with Italian 1/1 Infantry (or similar- whichever is weaker and maybe even one of the German AT units) then head through Thelepte to Kasserine- the terrain is better for you here plus you need to link up with your main force to gain dual supply lines for your western force- in case the enemy tries to cut the western supply line.
North Centre. Section 11 on observation posts discusses their value. If you have a unit on 30,9 and can see few units on the plain north to Rohia it might be worth making a dash for Sbiba and possibly Thala (again you MUST keep it THROUGH the enemy turn to gain the permanent VPs). Reconnaissance units would seem to be best for this. Alternatively you could move another unit up behind the hills to the northeast of this hex and use this unit to dash forward while the other continues spotting. Its remaining presence will improve artillery fire results in any combats around Sebitla.
It's well worth checking the following hexes at the start of your turn to see whether 'Theatre Reconnaissance' has spotted any of the following:
You might get lucky. Attacking these prior to deployment by the enemy can be a game winning option if you hit the stack with all air units- and it is well worth hitting it with ALL air.
I ran some tests to see the results of all air against the turn 6 28,0 stack on minimize, limit and ignore loss settings. Firstly the difference between the 3 is the following:
| Setting | # of Combat Missions | % of Turn Used |
| Minimize Losses | 1 | 10% |
| Limit Losses | 2 | 20% |
| Ignore Losses | 3 | 30% |
What this means is that an air unit on, say, ignore losses will conduct 3 combat missions in that round of combat, assuming it passes communications/proficiency checks to make each of those attacks. At 10% of your turn each mission, just conducting this ignore loss mission will burn up 30% of your turn.
In an ideal world, with no ground combat attacks taking place and no proficiency checks to prematurely end your turn, this means that you could conduct up to 9 minimize loss air attacks (1 per round) each turn.
I ran further tests against this stack to see the results at the 3 different settings- minimize, limit and ignore losses. The results (losses) would indicate little difference between the 3 given that the loss setting determines how many missions are conducted in that round of combat. Results below:
| Equipment | At Start | 100% | 90% | 80% | 70% | 60% | 50% | 40% | 30% | 20% | 10% | END | % Loss |
| Rifle Squad | 139 | 3 | 5 | 5 | 4 | 10 | 6 | 0 | 5 | 4 | N/A | 112 | 19.42% |
| Rifle AT Squad | 20 | 1 | 1 | 0 | 2 | 1 | 0 | 1 | 0 | 0 | 14 | 30.00% | |
| SMG Squad | 15 | 0 | 1 | 1 | 0 | 0 | 1 | 0 | 1 | 0 | 13 | 13.33% | |
| Engineer Squad | 15 | 1 | 0 | 0 | 0 | 0 | 1 | 0 | 1 | 0 | 14 | 6.67% | |
| Medium MG | 208 | 8 | 14 | 8 | 5 | 11 | 8 | 8 | 6 | 8 | 162 | 22.12% | |
| Heavy Mg | 176 | 10 | 6 | 7 | 10 | 6 | 5 | 5 | 6 | 5 | 137 | 22.16% | |
| 57mm/6 Pder AT Gun | 29 | 1 | 2 | 3 | 3 | 5 | 4 | 1 | 0 | 0 | 15 | 48.28% | |
| 105 mm Howitzer | 37 | 2 | 4 | 2 | 4 | 5 | 1 | 2 | 4 | 3 | 20 | 45.95% | |
| 155 mm Howitzer | 12 | 2 | 0 | 0 | 1 | 1 | 1 | 1 | 0 | 1 | 8 | 33.33% | |
| 60mm Mortar | 43 | 3 | 2 | 1 | 4 | 2 | 0 | 0 | 3 | 1 | 31 | 27.91% | |
| 81mm Mortar | 29 | 2 | 0 | 0 | 2 | 1 | 1 | 1 | 0 | 1 | 24 | 17.24% | |
| Truck | 484 | 25 | 18 | 24 | 21 | 16 | 10 | 15 | 12 | 16 | 380 | 21.49% | |
| Halftrack | 50 | 0 | 0 | 0 | 0 | 1 | 0 | 1 | 1 | 0 | 49 | 2.00% | |
| Totals | 1257 | 58 | 53 | 51 | 56 | 59 | 38 | 35 | 39 | 39 | 0 | 979 | 22.12% |
Note:100%=At Start. I didn't get a round 10 (10%).
| Equipment | At Start | 100% | 80% | 60% | 40% | 20% | END | % Loss |
| Rifle Squad | 139 | 9 | 15 | 2 | 7 | 5 | 101 | 27.34% |
| Rifle AT Squad | 20 | 0 | 1 | 0 | 3 | 0 | 16 | 20.00% |
| SMG Squad | 15 | 0 | 0 | 0 | 1 | 2 | 12 | 20.00% |
| Engineer Squad | 15 | 1 | 0 | 0 | 2 | 0 | 12 | 20.00% |
| Medium MG | 208 | 19 | 16 | 14 | 6 | 10 | 143 | 31.25% |
| Heavy MG | 176 | 14 | 11 | 7 | 15 | 14 | 115 | 34.66% |
| 57mm/6 Pder AT Gun | 29 | 6 | 2 | 1 | 3 | 0 | 17 | 41.38% |
| 105mm Howitzer | 37 | 8 | 4 | 3 | 3 | 3 | 16 | 56.76% |
| 155mm Howitzer | 12 | 0 | 3 | 2 | 1 | 0 | 6 | 50.00% |
| 60mm Mortar | 43 | 1 | 5 | 4 | 2 | 2 | 29 | 32.56% |
| 81mm Mortar | 29 | 4 | 4 | 3 | 1 | 2 | 15 | 48.28% |
| Truck | 484 | 50 | 47 | 31 | 31 | 23 | 302 | 37.60% |
| Halftrack | 50 | 1 | 0 | 0 | 0 | 1 | 48 | 4.00% |
| Totals | 1257 | 113 | 108 | 67 | 75 | 62 | 832 | 33.81% |
| Equipment | At Start | 100% | 70% | 40% | END | % Loss |
| Rifle Squad | 139 | 15 | 14 | 12 | 98 | 29.50% |
| Rifle AT Squad | 20 | 1 | 2 | 0 | 17 | 15.00% |
| SMG Squad | 15 | 0 | 1 | 1 | 13 | 13.33% |
| Engineer Squad | 15 | 1 | 1 | 3 | 10 | 33.33% |
| Medium MG | 208 | 37 | 33 | 15 | 123 | 40.87% |
| Heavy MG | 176 | 24 | 23 | 14 | 115 | 34.66% |
| 57mm/6 Pder AT Gun | 29 | 3 | 1 | 3 | 22 | 24.14% |
| 105mm Howitzer | 37 | 11 | 4 | 8 | 14 | 62.16% |
| 155mm Howitzer | 12 | 5 | 2 | 2 | 3 | 75.00% |
| 60mm Mortar | 43 | 7 | 6 | 1 | 29 | 32.56% |
| 81mm Mortar | 29 | 3 | 4 | 2 | 20 | 31.03% |
| Truck | 484 | 73 | 61 | 43 | 307 | 36.57% |
| Halftrack | 50 | 2 | 2 | 3 | 43 | 14.00% |
| Totals | 1257 | 182 | 154 | 107 | 814 | 35.24% |
Results are somewhat similar- bear in mind this is a sample size of one so I would imagine differences would be minimal in a larger sample set. But results are essentially those of a test in a 'vacuum'- there are no simultaneous ground combats with their inherently variable durations. The key then is to MAKE SURE you plan air attacks wisely in conjunction with your ground attacks.
If you have some ground attacks to conduct at the start of your turn that might burn up 1 round (10%) of your turn you should use minimize loss setting for air. If the ground combat does take the expected 10%, you've flown only the one mission that you expected. If on minimize losses for air the combat round took 30% due to ground combat taking longer than expected, you've wasted time- your air units have only conducted 1 mission in the 30% time taken by the ground units to resolve their attacks, when they could have flown another 2 missions in that time (or one attack at Ignore Losses which equals 3 missions).
If you expect the ground combat to go 3 rounds, you should set air to ignore losses- this way they fly 3 missions and your ground and air combats are now maximized in terms of efficiency- no time is wasted by either ground or air units. Obviously if the ground combat only takes 10% (1 round) and your air is on ignore losses, you've wasted some ground combat time.
You also need to be aware that the more rounds you try for, the more likely you are to fail a proficiency check and have your round end. This would tend to favour the Ignore Losses setting for air attack.
In summary, it's a judgment call and best guess estimate. But given the kill ratios I would doubt that your ground combats would come close to matching the kill figures the air achieves against a stack of 8 units in this instance. This would tend to favour starting off your turn with an ignore losses air attack combined with any ground attacks you are making- at this stage of the game you are usually already at the enemy line anyway. One approach might be an Ignore Losses (30%), Ignore Losses (30%) and final Limit Losses (20%) attack, all coordinated with the ground combats, leaving you with 20% of your turn left for 'housekeeping' duties such as digging in. Obviously you also want to place your air on Interdiction at the close of your turn- and they will now be pretty tired, so you may wish to make sure their loss setting is no longer Ignore Losses, especially going into the next turn.
Aside from the hex mentioned as regards Sebitla, there are a number of others on the map that are worth taking possession of. Using these is a trade off between having them haul their asses up there (it takes generally all movement), thereby not being available for other duties during the turn and the intelligence a look around can gain you. Sometimes this is vital in seeing enemy concentrations behind the line or looking for weak spots. Sometimes it is worth moving up, taking a look and then moving the same unit somewhere next turn based on data gained. An example of this would be 30,9 as mentioned in section 9.2 on Sebitla. If you can see few units on the plain north to Rohia it might be worth making a dash for Sbiba and possibly Thala. Reconnaissance units would be best for this type of scouting, as well as best for making any sudden dashes behind enemy flanks or lines.
To repeat what was mentioned in section 9.2 on Sebitla- once you take any of these hexes you will notice a lot of hexes changing from 'unknown' status to 'observed' or 'spotted', the difference, again, from the help file:
"Your knowledge of any particular map location may be:
Some other peak hexes of note (don't forget your picnic hampers):
Note also that any of these hexes occupied can provide benefit to artillery placed on them. Again, from the help file: "Mountain peaks within observation range of the combat location increase effectiveness of long range fire.".
South of, in it and to the northeast of the Kasserine Pass are a number of impassable mountain range hexes. These can prove useful for encirclements in that you will require less units to execute them. An example would be 14,4- here you only need to have 13,15, 15,14 and 15,15 occupied and be able to attack to possibly force enemy unit evaporation. Units backed into corners like this are also out of supply- supply lines cannot cross mountain hexes. If you can place a unit (that has ZOC- not a broken down unit) on 23,8, have Kasserine and units at Sebitla otherwise hemmed in, his supply is seriously curtailed.
Try to keep a small reserve NOT subject to disengagement as an emergency 'fire brigade' or to go for spotted opportunities.
No- I'm not talking about ammunition here. Sometimes going for that extra round of combat can leave you in a seriously compromised position- units not dug in (particularly artillery) and an enemy counterattack pending. Or you didn't manage to get your air units back on interdiction. Mea Culpa here- it always happens to me sooner or later every game, but be careful…
Obviously it's helpful to look at this situation from the position of your opponent- once you've recovered from a wave of sympathy and a genuine concern for his welfare.
One natural side effect of trying to kill units- the enemy will usually end up with lots of demoralized broken down units. One of his (few- only?) strategies is to try and cut your supply lines and/or hold VP locations with these (once they've recovered)- if he does you have to divert a disproportionate amount of resource to rectify the situation. Keep your lines of communication clean- not necessarily garrisoned everywhere but be aware cutting these is one of his few options and maybe, indeed, priorities. I'm not sure if it's possible to avoid a unit slipping through- if it does pursue with a reconnaissance unit and kill- with air support if necessary. Whatever you do don't use an AT unit- over rough ground it will never catch up.
You'll also find him carefully husbanding his artillery- perhaps the only part of his order of battle that functions well. Kill it whenever you can- attack it with air also (you may find it stacked together). If you've an even choice between attacking a stack with armour or artillery, I'd pick the latter. Other than that the enemy's strategy is basically to hold VP locations where he can and this means playing something of a reactionary game to your moves- so try to keep him off balance when YOU can.
If you come within 2 hexes of 17,9 there is a 75% chance that British forces will arrive at 28,0. It's doubtful this will happen very early in the game- usually later when your men are exhausted but winning. The last thing you need is fresh reinforcements bearing down on your (presumably by now) right flank. Avoid triggering this event like the plague. Be aware also that your enemy may try and force a retreat to trigger this.
I think this scenario portrays well what actually happened on the day but the play balance is not good if the Axis get it right. However, if you follow these moves it is a good introduction to what can be achieved with the 10 combat/movement rounds/phases in a turn, and this seems to be the crucial key to being merely competent or good (certainly at a tactical level- it won't help you strategically if you decide that Jebel Aboid MUST be taken and move everything you have to do so) within the TOAW system.
I've tried to write this as a guide to beginners (which I still am myself), particularly as relates to getting more than one combat round per turn. Writing this was a pleasure in that I feel I am finally returning something of the effort that others put into documents that- while I was still learning the intricacies of the TOAW system- I was grateful to stumble upon and find useful myself.
I'd be interested in hearing any alternative Strategy & Tactics or others' thoughts on this scenario. If you have any questions yourselves regarding the above, please feel free to contact me.
Finally- Good Luck (Hals und Beinbruch)!
iThanks to “Siberian HEAT”
and “JAMiAM” for explaining the intricacies of unit disposition
and the effect they have on fire missions as follows: if Artillery is in mobile
status (consider it ‘limbered’) it does nothing support-wise. Be
careful though that you don't dig it in on your turn and THEN try to use it
in direct fire. It will use all your combat rounds (since it has 0 MPs remaining)
AND will not be dug in on your enemy’s turn for defensive fire support
if needed. Also, obviously, don't dig it in if you need to move it later in
the round. Finally watch for ‘end runs’ on your artillery by the
enemy and place them behind the lines or try and stack them with other units
if you are in a heavily contested combat zone. The obvious consequence of this
if you need artillery for defence in your opponent’s turn is that you
have to be careful about how many rounds you use before you decide to dig artillery
in (and not use it again in your turn in DIRECT fire mode). Possibly your best
bet if advancing is to leave in tactical mode to support all in-range attacks
with 50% of strength (assuming it passes its communications test) between movements-
if your turn ends unexpectedly it will also support defensively in the enemy
turn.
iiThanks again to “Siberian HEAT”
for suggesting this improvement on my original encirclement. If successful and
it usually is not, it allows for better positioning of units for an advance
towards Jebel Aboid and Kasserine on turn 1 later rounds. It is well worth trying.
ivPanzer Mark IV (PzKfwIV) German Battle Tanks.
Not nearly as good as the Panzer Mark VI (PzKfwVI) model (Tiger), but still good all the same.