
Tannenberg 14-
Russian Strategy & Tactics
by
General Staff
|
Tannenberg 14-Russian Strategy & Tacticsby |
|
The following are some Strategic and Tactical suggestions for the Russians in The Operational Art of War's Tannenberg 14 Scenario (v3.0 ACOW Version) by Todd Klemme.
The article comes with an SAL file (contained in a ZIP file- Tannenberg 14 Start.zip) that represents a PBEM game begun using Russian password 'Password'. The file is set to the point where all pre-combat movement has been executed and round 1 attacks set up for resolution. Players can resolve round 1 attacks for themselves, set up and resolve subsequent combat rounds (and movement should they wish), and then continue the game through to the German turn (select your own German password). Since 'Fog of War' has been turned off, playing back the turn step by step will show all movements for all units in the Russian turn- unit name is visible at the bottom of the playback screen. This way players can follow- step by step and should they wish- all movements and combats executed in the Russian turn. Bear in mind that with FOW off, players see a lot more than they otherwise would in playback (i.e. everything)- they might want to set up the positions from scratch using a 'hot seat' (instead of PBEM) game with FOW on, and then look at the Turn 1 situation (and beyond) from a German perspective.
This is the best I think one can hope for against a reasonably competent German player- anything better is either very good luck or incompetence on the part of a German commander (or both).
Firstly recognize it for what it is- compared to the precision instrument that is the German Army, it is an ill-disciplined mob with a lot of front-line units at c40-50% proficiency. Most reserve units are pitiful at 20% proficiency, and in a moment of initial panic I even seriously considered disbanding them in the hopes of using them to replace casualties in better units. That is until I noticed they consist of Irregular Squads so it would be a fruitless exercise- they won't go to swell any 40% proficiency outfits, and are basically just good for digging and that's about it. Note that disbanding can still be seriously considered for artillery units in these reserve formations, since they share equipment with 'regular' formations- however for morale (read realism) reasons I choose not to.
And sure, there are plenty of bodies, but with low proficiency and supply, Russian formations have a tendency to disintegrate under any serious blow. Rather like the Russian Army of early WWII, the best tactic seems to be to put the troops between the Germans and their objectives and hope they hang on as long as possible before being swept aside- the result can be influenced by a number of factors, including the amount of digging and reinforcements if available.
Fortunately for us as we play the Russians, we don't have to factor in the historical animosity between the two Russian Generals (Rennenkampf (1st Army) and Samsonov (2nd Army)) that actually resulted in physical assault on at least one occasion and was one of the contributing causes of their catastrophic defeat here.
The key here is as in almost all WWI scenarios is to get as far forward as quickly as possible with as much as feasible and then defend as best as possible- if you do this, then time is on YOUR side, and it's about the only thing that is. One could argue that a regiment defending a location today is worth a division attacking the same location tomorrow- casualties in WWI are just so horrific. Rommel came to realize this in exactly this type of warfare (he was a Lieutenant on the Eastern & Italian Fronts in WWI)- in the long run it's far cheaper to hold a place with little force quickly and run the risk of being ejected than it is to be cautious and then try to take the place against much heavier opposition later. And just look how effectively he implemented this doctrine in WWII.
So Turn 1 (and I believe Turn 1 sets the tempo of the battle) is crucial. The goal should be to take as many objectives as possible and hold them as long as possible. Goals that start in German hands that are achievable Turn 1 by the Russians are (south to north): Lautenberg (30), Willenberg (30) and Tannenberg (30).
Lyck (30) and Stalluponen (30) can also be taken, resulting in 190 VPs at start- a significant victory. It's then up to the Germans to wrest that from you- and obviously you to struggle to keep it. An overwhelming victory is 259, a marginal victory 172 (if you don't have it already there's a utility to calculate these thresholds at Victory Level Calculator). So you've got a slim margin (18) on the downside to an MV and a large one on the upside to get an OV (69). Taking Gumbinnen (30) might help get you there but I certainly wouldn't try for this at start as you don't get much here in the way of infantry until turn 3+ and will have a hard enough time just holding Stalluponen until reinforcements arrive. A draw is 87 so you've got an objective or 2 between where you start and that victory level if you decide to use the strategy outlined here.
I use this in every WWI scenario, with slight modifications depending on peculiar local conditions (for instance the rear unit occasionally on Tactical Reserve to help burn enemy rounds if the front line is attacked, though the poor quality of Russian infantry units makes that less useful here- I'd refer the reader to my article on Ottoman Strategy & Tactics in Balkans 12 for a case where it can make a crucial difference.
Rotate units in and out of combat as they wear down. Split units into 3. Have 2 units in the line with the third (weakest?) one hex behind. Use this rear position to both rest units and dig to construct second lines, preferably in good supply. If possible only 2 out of 3 'pieces' of any unit should be in the front line- if only one is attacked you may be able to rotate units in and out of combat so that 2 out of the 3 are in reasonable shape.
If possible- though again it is less so in this scenario than others- rotate entire formations out, putting them either in total reserve or else in the front line in areas that are less threatened and/or needed by the enemy.
If there is (or should be) a WWI mantra, this is it. Dig as though your life depended on it- in WWI it almost always does. And all day, every day. Check EVERYTHING possible is dug in before your last round/turn end. Try to ensure that your movements are carried out in such a way as to ensure you keep the 1MP you will (at least) need to dig in at the end of every turn (see Ground Conversion below). In my deployment there are some exceptions, and I explain these on a case-by-case basis.
Also remember that units with engineers facilitate digging.
Converting ground to your control results in the enemy paying additional movement costs to enter- generally an extra 1MP- which equates to supply loss to them.
Wherever possible I've broken units down (particularly Cavalry) in order to convert as much ground as possible to Russian control.
West of Lautenberg I've also run units around to convert as much ground as possible to my control without awakening any German units prior to their Turn 2 activation and ensuring they keep the 1MP necessary to dig in after movement. With careful husbandry of unit MPs- often breaking units up and then recombining them- it's possible to convert a lot of territory to your control while ensuring you have the (at least) 1MP remaining you will need to dig in.
Guard your rail lines carefully and be aware of your supply points (map edge railheads and Warsaw). Supply and distribution efficiency for the Russians are truly desperate here with a supply point start of 16 and supply radius of 1 (the Germans have supply point start #s in the mid 40s with a supply radius of 2)- in '4' terrain with most formations you're lucky to get 2 Supply if moving and 3 Supply if not, which doesn't bode well for any sustained offensives (or indeed any operations), and the last thing you need are them getting worse if your rail lines are cut. You might want to keep supply trace on to be better able to see potential supply in any hex.
Likewise guard your HQs with Support Squads and Command Groups. This scenario uses these to determine Supply Distribution Efficiency and Command Coordination- allow these units to get hammered and you'll find supply even worse and reorganization common. I try to keep HQs with other units and behind the lines where possible.
Units should always be placed adjacent to their HQs whenever possible for the 50% supply boost. Bear in mind most formations are operating using 'Internal Support', so HQs of other formations won't provide any benefit.
If you can stay out of range of the German fortress units (4 hexes). These things can be lethal so give them the respect they deserve. Their lethality is highest at 2 hexes, within range of all of their weapons, except 2x420mm Guns with a range of only 1 hex. Only 2x350mm Guns out of a total of 20 range to 4 hexes so at this distance these units can't do much damage. And with 0MPs it's a foolish (or desperate) German player who'd ever consider using them for direct fire.
Cavalry raids behind enemy lines can tie up vastly disproportionate enemy forces as they hunt you down and, in particular, they force the collection of 6 units (or pieces of units) to get the surround necessary to force your unit's surrender.
Once infantry is in position to replace cavalry, I'll try to withdraw cavalry to rest and then use it again in its role of scout/raider with its high reconnaissance rating and the ability to easily get through enemy ZOCs. Units in the far north may try to raid further behind lines to tie up enemy resource. Conversely, try to be sure this DOESN'T/CAN'T happen to you. Don't leave gaps for enemy raiders to slip through.
Using this judiciously can help burn up enemy rounds (and therefore ultimately turns) as units on TR move to help adjacent units under attack, potentially prolonging the number of rounds a combat takes. Cavalry (at least when relatively fresh) in particular with its high reconnaissance value can be very useful in this respect.
If the answer to all the above is Yes, OK. If it's NO on 5 of 6 counts, think again. And for every one item that's a no, think yet again- more often than not you'll find yourself trading your rifle for a shovel. And if you still decide to go ahead and anything goes wrong, well... just don't ever lose that shovel... best thing since the wheel.
The above is if one desperately needs a particular hex. Otherwise, combat tactics should revolve around inflicting disproportionate casualties when opportunities present themselves- 'opportunity fire' if you will. Limited Attacks at a Minimize Loss setting using a broken down unit with direct (i.e. 2 hex range) arty support on large stacks or units in the open and not dug in are best. Anything else should use this as an 'ideal' baseline. The initial attacks I propose Turn 1 in the north are a good example, in that they are essentially 'worrying' attacks that drain a unit of supply and eventually effectiveness, at which point casualties will start to escalate significantly. These would represent something along the lines of Cossack raids- even harking back to the days of the 1812 retreat from Moscow- individually insignificant, cumulatively and over time totally crippling.
The Germans do not get nearly as many replacements as the Russians, so casualties count, both in terms of points and reduced German combat effectiveness if you can seriously damage their units.
With all the above factors in mind, my suggested dispositions at the end of Turn 1 are shown below (apologies if the graphics seem a little degraded, but there's the usual trade-off between quality and file size/download time- I have original PNG files for those who would like better quality: Entire Map (2710K); Western Deployment (580K); Central Deployment (785K); Northern Deployment (495K)). Again, I'd point out that using the attached SAL file it's possible to playback each individual move and see exactly which unit is going where. Notes:
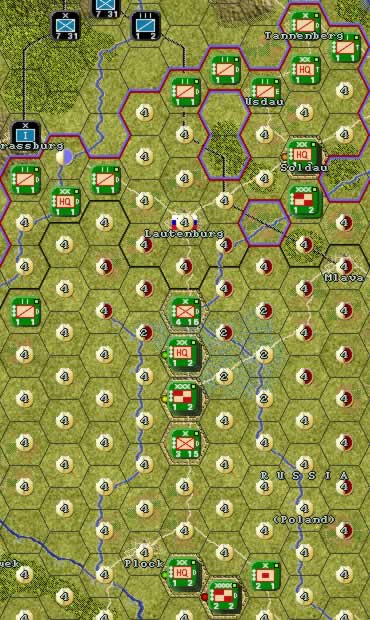
1) 8,24. The unit here restricts the movement ability of 70th Landwehr- the only unit in this sector able to move on Turn 1, aside from 8th Army HQ and Supply Unit. The HQ behind it can provide arty support and hopefully help prevent an overrun. Turn 2 I'd look to cut the railroad adjacent to hinder German rail transport. Units in the area here have converted as many hexes as possible, including some of the river hexes, keeping only at least 1MP to be able to dig in.
2) 9,24- I blew the bridge to make it more expensive for 70th Landwehr (and any other) German unit to cross.
3) Reaching Tannenberg is a stretch, but it can be done with good planning- you have to use HQs to reduce River Crossing costs at 15,25. First get XV Corps HQ there (with 0 MPs remaining). Next 8th Div HQ and 6th Div HQ (2 MPs remaining each). Last 24th Div HQ (0 MPs remaining). This provides the 20 Minor Fording Points to eliminate the crossing cost and allows I/6 of 6th Cavalry Division to get to Tannenberg and dig in. Leave these HQs here until all following troops are across (6th Brigade are last over). HQs can also be used to help at 25,25 (XIII Corps HQ, 1st Division HQ).
4) 2nd Division will defend the crossing at Plock.
5) 10,33 SW of Plock. I will blow the bridge once (if) German units are committed south of the Vistula, but little point showing our hand straightaway here. I'm not planning on defending anything below here unless Warsaw is threatened in which case I'll rail in troops. Plus enough come in nearby anyway. Neither am I defending west of the river above this bridge. It forces Germany to fight away from the rail line and high supply if he wants to fight at all here. My line down here is the Vistula itself which he can't cross except at bridges and the Plock-Lautenberg tributary- so I Corps has been stopped on its way north with all units having 1MP remaining to help dig trenches behind the river.
6) HQs are adjacent to units for supply benefits whenever possible.
7) In moving up to Tannenberg it's important not to duplicate the Russian mistake and get trapped there between 3 German pincers. You just have to watch German dispositions and movements very carefully and react appropriately.
8) It pays generally I believe to look at any situation from the enemy's perspective. What would you do with the unit in Strassburg Turn 1? If it tries to recover anything it may get surrounded and destroyed on the Russian Turn 2- or if it moves away the Russian units nearby can cut up the railroads. Similar dilemmas exist with the German 8th Army units in Allenstein and the Lutzen Garrison.
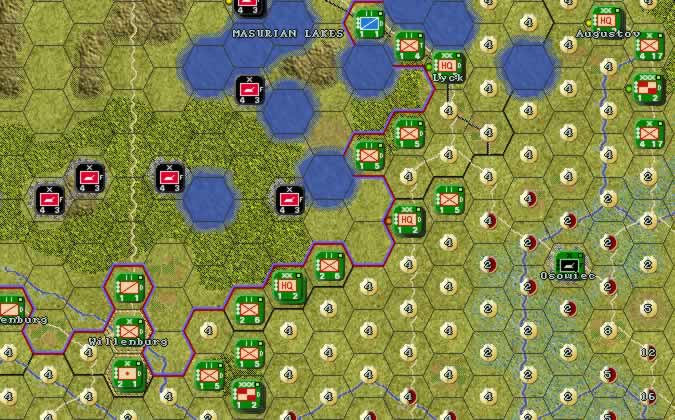
1) XIII Corps is in a position to help either Lyck or Willenberg. Most of 36th Division in 28,20 didn't dig in and this is one of my aforementioned exceptions- speed is just essential to get these units up north as soon as possible to aid at Lyck or help the cavalry further north.
2) VIth Corps near Augustov to the northeast is also not dug in for the same reason, but is in a position to assist at either Suvalki or Lyck.
3) Note the 3rd/II/3rd Guards Division unit on Tactical Reserve in 28,16- should the cavalry unit in 27,16 be attacked (by the Lutzen Garrison Turn 1), this unit may go to its assistance, possibly burning additional combat rounds.
4) Units north and east of Willenburg are broken down and as far forward as possible to convert hexes in front of the German fortress belt north of here. No digging has been undertaken within 2 hexes of the forts since- given the Russians will not be defending within the forts' effective 2 hex range- it amounts to digging trenches for the Germans.
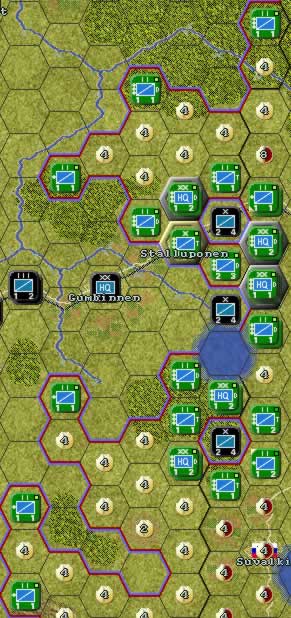 1) Broken down cavalry have been used extensively here to convert as much territory as possible, leaving forward units often not dug in and very vulnerable, though I view this as a necessary trade-off. Note a number of these in forward positions are on ML setting, since as a screen they're not required to hold their ground- if attacked they can fall back.
2) Movement and attacks have been set up- units with 12/13 MPs remaining initially- to try to get as many combat rounds in as possible. Broken down Russian (Cossack) Cavalry units can take 2 or so attacks against these German Cavalry units before exhaustion or elimination, so I've staggered units' remaining MPs where possible. For instance, 2nd/I/3rd Cavalry in 32,4 can take over the assault on the German 1st Cavalry Brigade from 1st/I/3rd Cavalry in 33,5 once combat rounds take both units down to (or below) 10/13 MPs remaining. Likewise for units in 33,11 and 33,10 assaulting 3rd Cavalry Brigade.
3) The assault on 2nd Cavalry Brigade can only begin once combat rounds take units down to (or below) 10/13 MPs remaining. And 1st/II/1st Cavalry in 33,7 can only take over once units a\re down to (or below) 5/13 MPs remaining, though this is not a priority combat anyway since the German troops here have an escape route back across the river should they need it.
4) An aggressive German player will probably counterattack heavily to try to extricate his cavalry units here. So a good number of units are on Tactical Reserve to try to burn combat rounds and essentially create mayhem with German movement and combat in this sector.
5) Russian Cavalry here is being used rather like to a pack of wolves (or Cossacks?), each in turn nipping at a German cavalry brigade trying to eventually cripple and then- with no escape route available to it- destroy it.
6) Note again HQ placement- both to provide artillery support (no direct fire is possible- or at least if you try it's treated as an assault as opposed to barrage- since the guns have a range of only 1 hex) and to provide optimal supply benefits to the extent possible to formation units.
It's difficult to advise on anything post-Turn 1, given the vagaries of combat and enemy reaction. On Turn 2, an aggressive player will likely try to extricate his northern cavalry brigades and attempt to destroy and cripple as many of your cavalry units in this sector as possible, whilst trying to reconvert hexes in other sectors with the few units able to move to prepare for advances by the bulk of the German Army on Turn 2+. A less aggressive player will likely just await the activation of the bulk of the German Army on Turn 2.
Time is one of your few allies- you have to pace yourself for 13 turns and try to hang on for as long as possible to the objectives you have seized Turn 1. As each is lost- and barring German incompetence or incredible bad luck they will be one by one- you need to make sure that you are one step ahead in the digging game. Whenever and wherever possible, you should always have a trench line to fall back to once each front-line is breached and compromised. If you can do this, with few replacements coming up the Germans will eventually exhaust themselves.
Whether you can keep the Germans away from Lyck and Suvalki in particular may mean the difference between winning and losing- lose both and, assuming you've also lost Stalluponen, Willenberg, Tannenberg and Lautenberg, you will have a Marginal Defeat (-150 excluding casualty score). Even if you keep Suvalki, at -90 (excluding casualty score) you still have a Marginal Defeat, though at -86 or better you have earned a Draw. The moral of the story here being that the casualty differential counts and can make the difference between a Marginal Defeat and a Draw.
Following the strategy and tactics I've outlined here also, I believe, maximizes the chances of a Draw or Marginal Victory.
Obviously this is dependent on how the game is progressing and where they might be most needed. All things being equal it makes logistical sense to keep them if possible in the sectors in which they appear. Units arriving on the roads in the northeast would be best able to aid in the northern defence, those arriving on the central or southern rail lines would be best moved by rail to aid in the central or western defences.
Whether you try these ideas out or have your own, as the Russian player I'd have to wish you good luck- it surely is a challenge to extract a draw or better as the Russians from this scenario. A historical irony is that Prittwitz, the German commander, appears to have lost his nerve and was recalled for actually suggesting that East Prussia be abandoned to the Russians.
For those with an interest, there's a lot of good information on all the skirmishes surrounding this campaign (and others) at:
http://www.firstworldwar.com/battles/ef.htm
In closing, I do hope you find this article useful and I'd be very interested in any comments, suggestions, improvements, differences of opinion and, in particular, alternatives- please send using the author link at the top of this article.